Basic Knowledge of Plastic Bumpers
1. What types of plastics are commonly used for automotive bumpers?
PP (Polypropylene), TPO (Thermoplastic Polyolefin), and ABS (Acrylonitrile Butadiene Styrene) are commonly used, with PP and TPO being the most widely used materials.
2. Why is painting plastic different from painting metal?
Plastic has low surface energy, is non-conductive, and flexible, so it requires surface activation or adhesion promoters, and flexible additives coatings.
3. What problems occur if mold release agents are not removed?
They cause poor adhesion, fisheyes, peeling, and paint delamination.
4. What is the purpose of cleaning and degreasing raw plastic bumpers?
To remove oil, dust, silicone, and contaminants that negatively affect paint adhesion and appearance.
5. Why are plastic bumpers painted offline from the body?
Plastic requires lower curing temperatures and different handling compared to metal body parts.
6. Describe the complete plastic bumper painting process flow.
Cleaning → Surface activation /Adhesion promoter → Primer → Base coat → Clear coat → Low-temperature curing → Inspection.
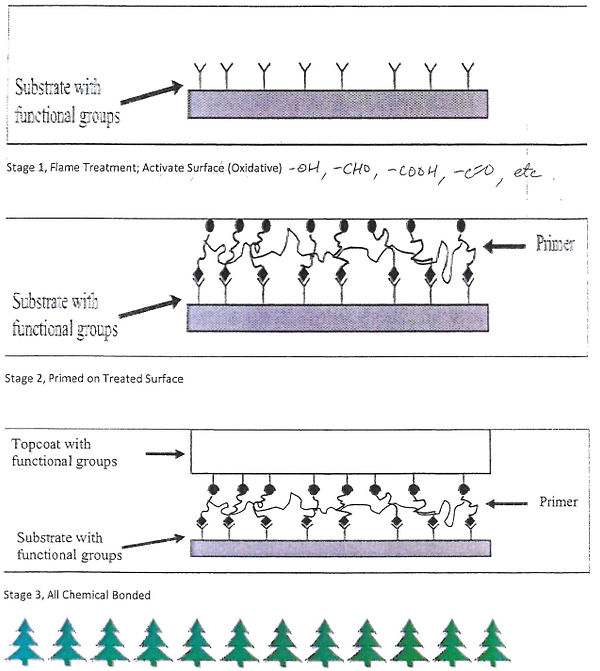
7. What is surface activation and why is it required?
It increases the surface energy of plastic to improve paint adhesion.
8. Explain flame treatment. (Usually use for waterborne primer)
Modify the plastic surface energy (Activate the plastic surface; flash oxidation) to improve adhesion; flame uses controlled heat.
9. What is an adhesion promoter? (Usually use for solvent borne primer)
A special coating which contains, CPO (chlorinated polyolefin) that improves adhesion between primer and PP or TPO substrate.
10. On which plastic materials is an adhesion promoter mandatory?
PP and TPO plastics.
11. How many major types of primer for Aftermarket replacement plastic bumper?
a. Adhesion promoter (CPO) – solvent borne primer or solvent borne primer contains high percentage of adhesion promoter.
b. Adhesion promoter (CPO) - waterborne primer.
c. Flame pretreated - waterborne primer (2K)
Only c is the environmentally friendly with HAPs Free (Hazardous Air Pollutants free) process. Please see a video link for the preparation and painting a waterborne primed plastic bumper, https://youtu.be/osR_3mdeY4M
12. What does the mechanism of solvent borne primer or waterborne primer work respectively?
Please see the Appendix I, primer mechanism.
13. Why is a flexible primer required for bumpers?
Because bumpers deform under impact and the paint must flex without cracking.
14. What is the typical curing temperature for plastic bumpers?
Usually between 60°C and 90°C (140°F-194°F), depending on plastic material and paint system.
15. What happens if curing temperature is too high?
Plastic parts may warp, deform, or lose mechanical strength.
16. What is the function of clear coat on plastic parts?
It provides UV protection, scratch resistance, chemical resistance, and gloss.
17. What are the most common paint defects on plastic bumpers?
Poor adhesion, fisheyes, peeling, orange peel, pinholes, and color mismatch.
18. How do you test paint adhesion on plastic parts?
By cross-hatch, tape pull, or peel adhesion tests (ASTM 3359 with 3M tape #839).
19. What quality checks are done after bumper painting?
Visual inspection, adhesion testing, gloss measurement, color matching, and impact testing.
20. What flexibility or impact tests are done for bumpers?
Low-temperature impact test, bend test, and stone-chip resistance test.
21. Why is humidity control important in plastic painting?
High humidity can cause blushing, poor adhesion, and surface defects.
22. How does film thickness affect paint performance?
Too thin reduces protection; too thick causes cracking, sagging, or color mismatch. (must follow painting company’s instructions)
23. What spray parameters are critical in bumper painting?
Spray gun pressure, nozzle size, spray distance, overlap, and paint viscosity.
24. Why is airflow cleanliness important in paint booths?
To prevent dust contamination and surface defects.
25. How do you prevent contamination in the paint line?
By proper cleaning, filtration, controlled environment, and operator discipline.
26 How do you handle paint defects found at final inspection?
Analyze root cause, segregate defective parts, rework if possible, and implement corrective actions.
27. How does surface energy affect paint adhesion?
Higher surface energy improves wetting and bonding of paint to the substrate.
28. How would you perform root cause analysis for peeling issues?
Check material type, surface prep, adhesion promoter use, curing, and contamination sources.
29. How do you reduce rework and scrap in bumper painting?
By stable processes, preventive maintenance, contamination control, and continuous monitoring.
Plastic Bumper Painting – Troubleshooting Q & A
1. Q: Paint is peeling off easily from the bumper. What are the causes?
A: Low surface energy, missing or incorrect adhesion promoter, poor cleaning, mold-release contamination, or insufficient surface activation.
2. Q: Adhesion failure occurs only in certain areas. Why?
A: Uneven cleaning, incomplete flame treatment, or localized silicone contamination.
3. Q: Fisheyes appear after base coat application. What is the reason?
A: Silicone, oil, grease contamination, dirty air supply, or operator handling issues.
4. Q: Fisheyes appear even after good cleaning. What should be checked?
A: Air filters, spray hoses, spray gun contamination, paint material contamination, and mold-release residues.
5. Q: Color mismatch between bumper and metal body. What are the causes?
A: Different film thickness, spray parameters, curing temperature, or orientation effect on plastic.
6. Q: Orange peel texture on bumper surface. Why?
A: High paint viscosity, incorrect spray gun pressure, poor atomization, or improper booth airflow.
7. Q: Paint cracks after minor impact. What went wrong?
A: Lack of flexible additives, incorrect primer, excessive film build, or over-baking.
8. Q: Bumper deforms after curing. Why?
A: Excessive curing temperature or long bake time beyond plastic heat resistance.
9. Q: Pinholes or solvent popping appear after clear coat. Cause?
A: Trapped solvents due to short flash time, thick paint layers, or fast solvent evaporation.
10. Q: Poor gloss on final painted bumper. What are possible reasons?
A: Incorrect clear coat application, low bake temperature, high humidity, or poor paint leveling.
11. Q: Dust particles on painted surface. How to prevent?
A: Improve booth cleanliness, air filtration, tack-rag usage, and operator discipline.
12. Q: Adhesion passes initially but fails after aging test. Why?
A: Inadequate surface activation, weak adhesion promoter, or incompatible paint system.
13. Q: Clear coat delaminates but base coat remains intact. Cause?
A: Insufficient flash time, contamination between coats, or incompatibility between layers.
14. Q: Paint sagging or runs observed. Why?
A: Excessive paint application, low viscosity control, or slow spray gun movement.
15. Q: Bumper shows different shade at corners and edges. Why?
A: Uneven spray coverage, edge build-up differences, or orientation effect.
16. Q: Adhesion failure only on PP bumpers, not ABS. Reason?
A: PP has lower surface energy and requires adhesion promoter or/and surface activation.
17. Q: White haze or blushing on clear coat. Cause?
A: High humidity and rapid solvent evaporation during spraying.
18. Q: Rework rate is high. What should be checked first?
A: Cleaning process, contamination sources, spray parameters, and operator consistency.
19. Q: Same defect repeats after corrective action. Why?
A: Root cause not correctly identified, or corrective action not addressing the real issue.
20. Q: How do you systematically troubleshoot a paint defect?
A:
-
Identify defect type
-
Check recent process changes
-
Verify material & parameters
-
Inspect contamination sources
-
Implement corrective & preventive actions

Appendix I
Adhesion Mechanism for AM Solvent Borne Primer on TPO/PP Substrates

Stage 1, Substrate surface being etched by the solvent in the paint and the Ethylene Propylene Rubber component (EPR) Stood out of the surface.

Stage 2, CPO (Chlorinated Poly Olefin) material being diffused or penetrated into the substrate surface and entangled by intermolecular forces (NO Chemical Bonded)
Adhesion Mechanism for AM Waterborne Primer with Flame Pretreatment